Lumbar Spine Assessment Guide: Steps, Tests & Key Findings
This practical lumbar spine assessment guide covers gait, range of movement, myotomes, reflexes, sensation and upper motor neurone tests. Designed for clinicians and students, it provides a clear structure, highlights key observations, and links findings to confident clinical decision-making

Introduction
This basic overview of a simple spinal assessment is not fully comprehensive, but it will help ensure all the basics are covered and you have enough information to guide what to do next or what to assess more fully.
We will cover the basic structure below:
- Gait and weight baring
- Range of Movement
- Myotomes
- Reflexes
- Upper Motor Neurone
- Sensation
- Hips
Each of these will be explored in some detail but I definitely want to reiterate again, this is not fully comprehensive - it’s a basic starting point for further study!
Gait and Weight Baring
So, this for me is the simplest place to start and the easiest to assess. You have to (typically) collect your patient from the waiting room and then you walk with them to your assessment space. Already here they are walking and typically will not have any ‘assessment bias’ (e.g. not putting anything on or making out to be worse/better than they are) so it forms a perfect opportunity to assess simply how they are walking and if they are putting weight through both legs.
Typical things to look out for:
- Use of any walking aids
- Foot slapping (foot drop)
- Gait pattern (e.g. any Trendelenburg or even just an abnormal pattern)
- Speed and step length (again just spot anything abnormal if you’re not sure)
- Limp?

Now it’s time to put these in context:
- Any known neurological injury/pathology?
- Any known problems with the lower limbs?
What you are then left with could be abnormalities, so then these need to be linked to any other findings from the other bits of the assessment and interpreted/investigated as required.
Range of Movement
Again a nice simple one to start with and it gets the patient up and moving. Does it tell us a lot of information? Arguably no, but all patients will want to show you how much they can or can’t move! You can start assessing this again from the moment they come in to your clinic. Look at how they get up when you call them in and how they sit down when you take their history.
Looking at their lumbar movement will give you some indication of pain behaviours also and if these are present. How? Well imagine if your patient sits on a chair leaning forwards and then when you ask them to bend forwards during your formal range of movement assessment they can’t… how restricted is their lumbar flexion? Are there other factors at play?
Things to look for:
- Amount (range) of movement
- Quality of movement
- Apprehension as well as pain
- Compensatory mechanisms (e.g. bending knees when going into lumbar flexion)
Again put these in context:
- Any previous spinal surgery?
- Any conditions to cause stiffness/problems with movement?
Myotomes
Always part of the assessment I find people fear, miss out or generally think they have done but haven't. What do I mean? You need to consider what you are looking for and what movements correspond to which nerve root. Myotomes by their nature are specific to one spinal level so yes, you do need to be specific, but it doesn't need to take forever!
I think one of my greatest learning moments has been how to easily assess the lower limb myotomes in a concise but thorough way whilst also being slick with it so you’re not getting your patient up and down like a yo-yo!
| How I assess | Nerve Root | Points/Comments |
|---|---|---|
| Walking on tip toes | S1 | Walking is important as this tests both bilaterally and unilaterally |
| Walking on heels | L4 | Again walking to test both bilateral and unilateral |
| Single Leg Dip | L3 | You could also argue S2 as knee extension and flexion are being seen/tested |
| Resisted hip flexion in sitting | L1 + L2 | Sitting enables stability for the patient to do this and you get a true ‘reading’ |
| Big toe pull up in lying | L5 | I tend to do this when I have them lying for Babinski/hip testing |

So hopefully you are able to see from the table above that with a tiny amount of planning you don't need to get your patient up and down unnecessarily.
The order I tend to do things in is:
- Standing
- Assess range of movement
- Assess standing myotomes
- Sitting
- Assess seated myotomes
- Assess seated reflexes
- Lying
- Assess lying myotome
- Assess Babinski
- Assess hips
Again, really rough guide so you’ll probably find you add things to this as you go through, but it gives you some structure
Reflexes
Great tip for these - give it a good whack! Don’t go around injuring your patients but a tiny tap will often not illicit a reflex so don't be shy!
The table below shows how to test the reflex and which spinal level it is testing
| Reflex | How to Test | Response | Spinal Level | |
|---|---|---|---|---|
| Knee | Patient in sitting, find patella tendon and hit with reflex hammer | Knee Extension | L4 | |
| Ankle | Patient in sitting, Achilles tendon, hold foot and hit tendon with hammer | Plantarflexion of Foot | S1 | |
| Medial Hamstrings | Patient either prone or in supine (with hip slightly externally rotated), fingers over medial hamstrings, tap your fingers | Hamstring Contraction | L5 |
Great General Video on the Reflexes and Upper Motor Neurone Testing
Shorter video and shows L5 reflex!
Upper Motor Neurone Testing
Babinski!
Run a firm point (like the one on the other end of your reflex hammer) along the bottom of the foot - lateral border then sweeping across the metatarsal heads. Apply some pressure but you’re not pushing into the tissue like you would for massage!
The response should be a coming together of the toes and curling downwards
A positive Babinski is upward movement of the big toe and a fanning of the other toes
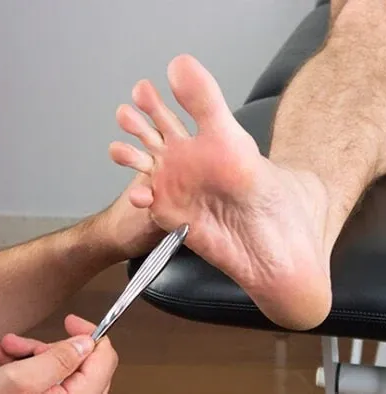
A positive sign indicates a potential problem in the upper motor neuron system and this will always require further investigation unless there is a known disease process.
NOTE: In infants, a positive Babinski is normal until 24 months of age and then the rules above apply
The other test to consider here is clonus. Clonus is a rhythmical, involuntary spasm of the foot which is tested by rapidly dorsiflexing the foot. Anything more than 4 'beats' (bounces of the foot) is abnormal. Testing is shown in the lower limb reflexes video above but to put is basically:
Patient in either long sitting or supine. Ankle in slight plantar flexion. Ensure patient relaxed and ankle is floppy and then rapidly and forcefully dorsiflex the foot. Count the beats! Usually there will be none but ensure you keep hold of the foot to feel any
Here's positive ankle clonus:
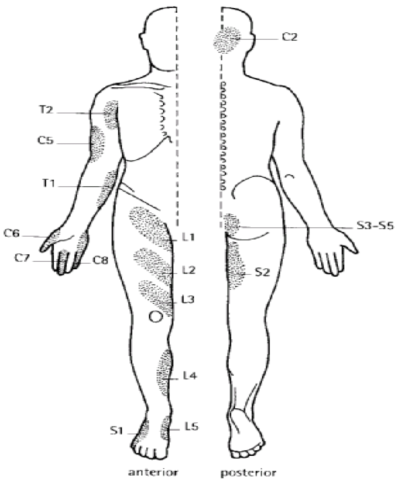
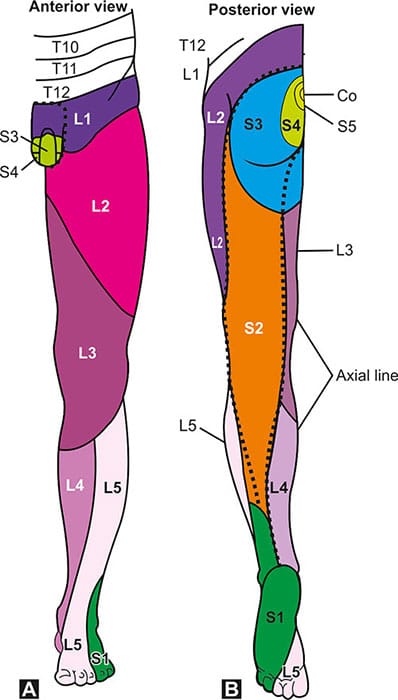
Sensation Testing
I've found it really useful to use the dermatome diagram below which shows the key areas so that your sensory testing can be as slick as possible. Obviously use the chart below that with the whole dermatomal areas on to confirm, but it gives a good idea.
Sensory testing is a weird one... it's very subjective to the patient and there’s no real way of confirming things so that's why I tend to do it last and then see if it throws in any curve balls, if it fits with their symptoms generally or not.
Check Out Our Quick Reference Printable Chart for Clinic HERE
Testing can be done with a neurotip (which has a scratchy pin on one side and blunt end on the other) or you could use standard touch, blunt needle - whatever you have that’s suitable. You do not want to prick the patient or draw blood/break down skin so be careful with what you use! I've found Neurotips to be very useful so if you don’t have them in practice ask your leads/manager if they can get some. Very inexpensive and make the assessment far better. I've even included a link below to show you how inexpensive they are! Get some yourself if all else fails!

Link for purchase: https://amzn.to/42LkDGj
TIP: if you have diabetic nurses in your practice (if you’re in primary care) then ask them for their monofilament. It’s basically a thin hair like structure attached to a pen/handle that tests sensation and gives a value of what is able to be felt. You don't need the value but it can give you an indication of light touch sensitivity if nothing else is available.
Hips
Nothing new here... just your normal hip testing to ensure that the patient's symptoms are in fact coming from their spine and not from the hip. You're basically looking to exclude the hip.
I generally look to do some range of movement testing, FADDIR test and FABER test. If anything presents as abnormal on these then I will progress to other hip testing but that's a whole chapter on it's own!
I tend to look at the movement, FADDIR and FABER tests and if it reproduces pain locally to the hip. I save this for last as by now I will have a pretty good idea if the back is involved or not.
Quick, handy (but very very simplified) guide:
| Feature | Suggests Hip Pathology | Suggests Lumbar Pathology |
|---|---|---|
| Pain Location | Primarily in the groin, anterior hip, or outer hip. | Often starts in the lower back or buttock and may radiate down the leg. |
| Pain with Movement | Worse with weight-bearing activities and putting on socks/shoes. | Can be aggravated by bending, twisting, or prolonged sitting/standing. |
| Associated Symptoms | Stiffness, reduced range of motion, and a feeling of instability in the hip. | Numbness, tingling, or weakness in the leg or foot. |
Little bonus... here is probably what I would do movement-wise as it's basically a catch-all screen like he says:
Wrap up!
So there you go hopefully this has been helpful.
Check Out Our Quick Reference Printable Chart for Clinic HERE
Also if you want to check out both our lower limb neuro and upper limb neuro clinic 'cheat sheets' they're available ether individually or as a pack here:


